Showing posts with label Neenah Solar White cardstock. Show all posts

Wednesday, September 26, 2018

Tropically Yours Stamp of Approval Collection

Tropical Cards

I love everything tropical - the foliage, the birds, the animals, the colourful water and the humidity.  When I heard the theme for this Stamp of Approval collection (by Catherine Pooler Designs), was Tropically Yours, I was sold.  It falls squarely in my wheelhouse.  The stamp sets are so fun and so well coordinated - they work wonderfully together.  I just had to get inky! (And I took this collection on vacation so I wouldn't have to wait. 😉😊😇)
I used a variety of stamp sets on this card, starting with the Grunge Background, which I stamped in Coral Cabana ink (Catherine Pooler Designs).  I stamped the leaves from the Leave Me In Paradise set using green ink from Gina K Designs (because I could take the ink cubes with me!).  I stamped a variety of border stamps from the Good Vibes border stamp set, using brown ink (also GKD).  Of course, I had to add some tufts of grass and a border underneath the flamingo, so he would have a place to stand.  I used the Coral Cabana ink pad and the direct-to-paper technique to create some flamingo coloured paper, then stamped and die cut the flamingo from the Stand Tall stamp set.  And, flamingos (at least in my world) love bling, so I added some Nuvo Clear Sparkle pen over the entire die cut.  After it dried, I popped it up on the card with some dimensional adhesive and added my sentiment (also from the Stand Tall stamp set).  The final touch was to add some iridescent gems on the flamingo's path and in the top palm leaf.

I stamped a frame of tropical leaves in Jelly Bean, Grass and Fresh Asparagus green inks by Gina K Designs for the next card.  Then I added several small flower accents in Coral Cabana (Catherine Pooler Designs) and a lovely bright yellow (Wild Dandelion by Gina K Designs).  I stamped the sentiment, from Leave Me in Paradise, and added some iridescent gems to the centres of the small flowers.  The last step was to stamp the hibiscus flowers in Coral Cabana and the stamen in Wild Dandelion before adding Nuvo Clear Glitter pen to them.  Once they were dry, I popped them up on the card panel and added the panel to an A2 size card base.  

The next card is a similar design, but I used the leaves from Tropically Yours and stamped them over the entire background panel.  Then, I used a border stamp to provide a grounding for the hibiscus flowers and added a sentiment from the Stand Tall set to finish it off.  I used the same ink colours as for the card above, except I added Coral Reef (GKD) for the centre hibiscus.

Geometric Themed cards

The tropical style is not for everyone. This collection includes some geometric dies that are to die for!  I saw a card by Iliana Crouse that was incredible and I had to make a variation of it.  As I was on vacation I did not have coloured cardstock with me, so I made my own using my ink cubes, Coral Cabana ink pad and some Neenah Solar White 80lb cardstock.  Then, I die cut a bunch of pieces from my handmade coloured cardstock and started adhering them to my card panel.  Each hexagon has three separate pieces.

I stamped the sentiment and border stamps from the Stand Tall stamp set on a square of cardstock that I had coloured with Coral Cabana ink, but it didn't stand out enough from the card front.  My solution was to create a slate coloured geometric border on a strip of of white cardstock and adhere that behind the sentiment panel.  The finishing touch was to add gemstones to the centre of each hexagon stack.

I just couldn't leave the hexagon dies alone and had to make another card.  I used the same direct-to-paper technique with my ink pads to create coloured cardstock, then die cut my hexagons and traded the inner pieces of the die cuts with the outer frames of another colour.  It was a little time consuming, but I like the result.  I added a border along the bottom because there was too much white space for my taste and then I simply had to add a sentiment to finish the card.

I am a huge fan of the Stamp of Approval sets because they make it easy for my to coordinate stamp sets and dies.  This is definitely one of my favourite collections.

Monday, September 24, 2018

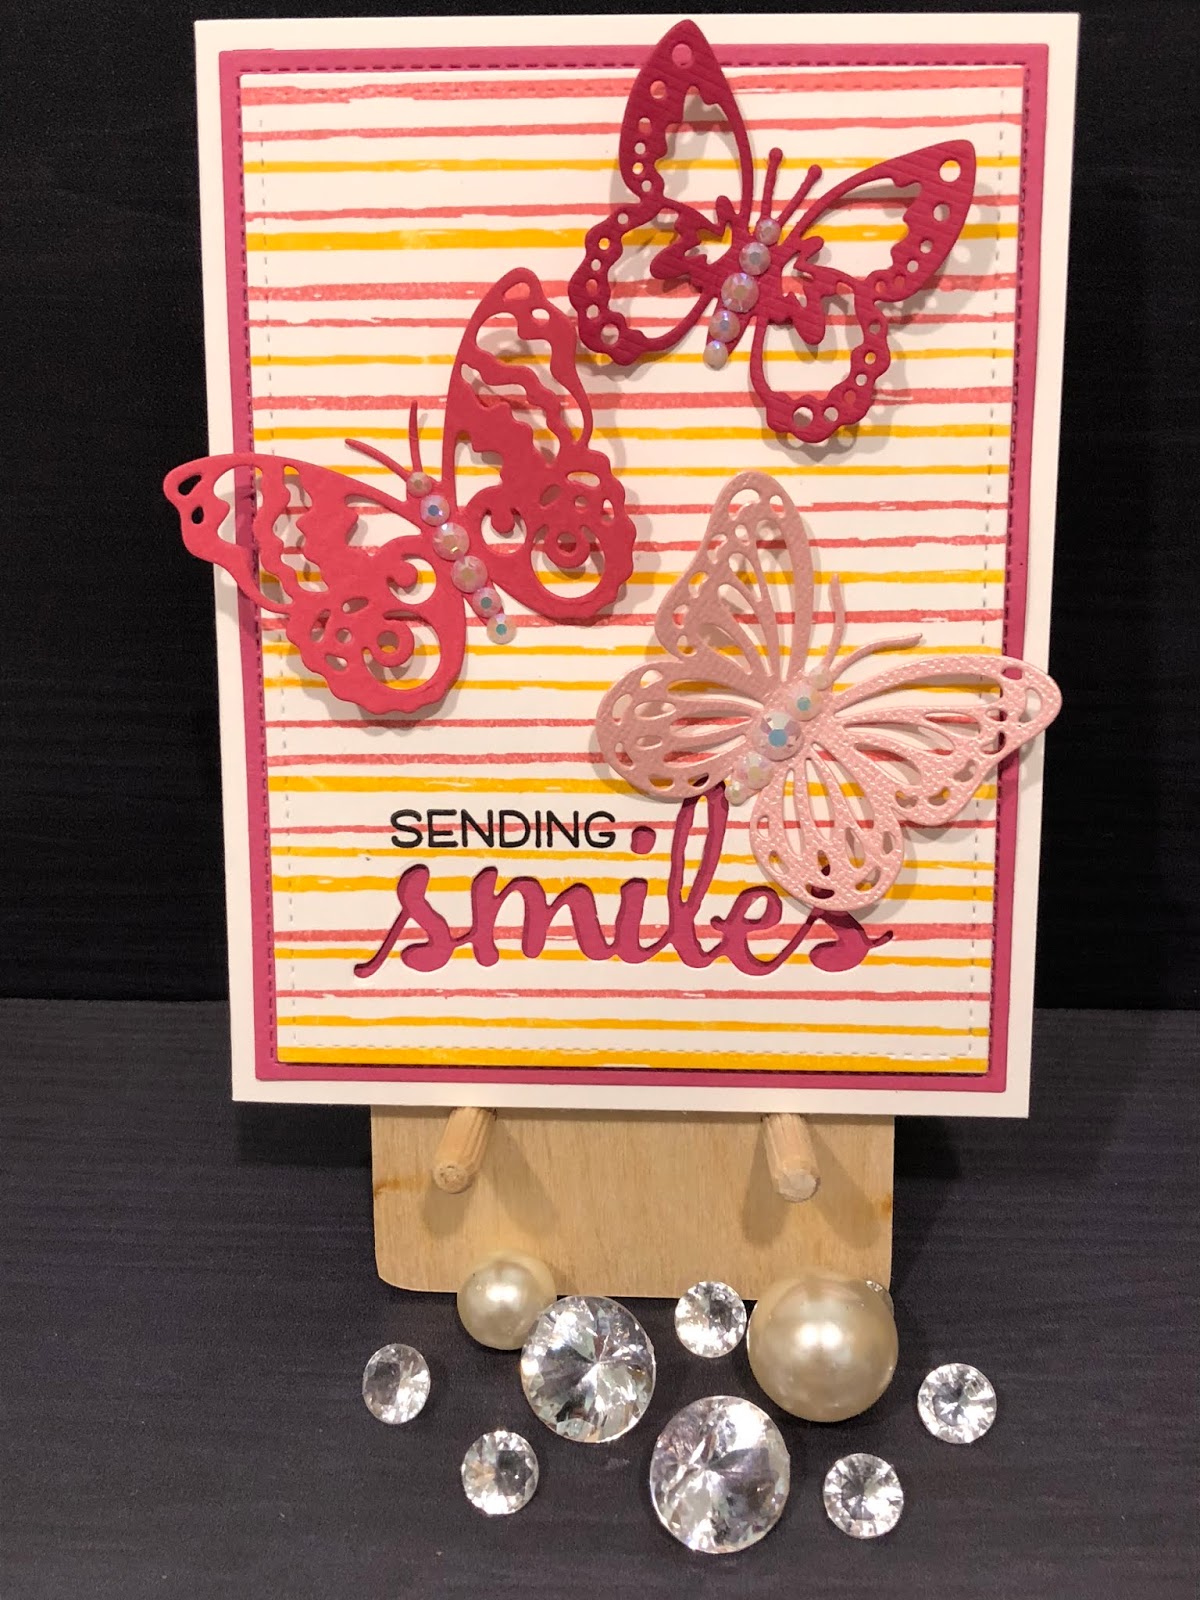
Sending Smiles

If you follow my Instagram account, you know that I love to save my scrap cardstock pieces and use them for die cutting images.  This card design provided another opportunity to use some of my scraps - this time, for butterflies.

 And, anyone who knows me is aware that I love the chance to add some bling.  To myself, to my cards, to my prop collection.  It's all good!

I started this card set using the Concord & 9th Sketched Stripes background stamp.  (I am in love with their background and turnabout stamp sets.)  I stamped the background stripes in two colours for each background to provide a bit of interest.
Once the backgrounds were stamped, I die cut them, and the coloured layering panels, to the sizes I wanted using the Lawn Fawn Stitched Rectangles Stackables (2nd largest die) and the Lawn Fawn Outside In Stitched Rectangles (largest die).  Then, I determined where I wanted the sentiment to be and die cut the "smiles" sentiment from each stamped background layer. 

 The sentiment die is from the Big, Bold, Friends set by Winnie & Walter.  I then stamped the "sending" sentiment above the die cut using Versafine Onyx Black ink.  This stamp is from the Lawn Fawn Happy Happy Happy stamp set.  The butterflies are from Sizzix and I added some gems from Lucy's Cards to the bodies of each butterfly.  It's hard to capture in the pictures, but the light catches nicely in the gems in person.
I used Neenah Solar White 80lb cardstock for both the stamped background panels and the A2 sized card bases.  The ink is by Catherine Pooler Designs (All That Jazz, Something Borrowed, Party Dress and Tiki Torch).  The coloured cardstock layering panels are Simon Says Stamp cardstock in Island Blue and Doll Pink.

I created a different version of the card using the same background stamp and cardstocks, but switching up the inks (Simon Says Stamp Clementine, Hot Mama, Sea Glass and Island Blue) and using the Island Blue cardstock as the base, instead of the white.  I also  changed the sentiment die to the Fancy Aloha die, by Your Next Stamp, and swapped the individual butterflies for a butterfly border (also by Your Next Stamp). 

The butterflies are die cut out of the stamped background and popped up, offset a bit to show the blue background cardstock.  Instead of die cutting the sentiment out of the background, I die cut it out of matching Island Blue cardstock, stacked several together and slightly offset them onto a black cardstock (Licorice by Lawn Fawn) die cut of the same die.  Next, I adhered the stacked die cut sentiment to the card and, as a final touch, I added Nuvo Crystal Glaze to the butterfly border, to subtly set it apart from the background.

Saturday, September 22, 2018

Clean and Simple Christmas Cards

Christmas Lights 

Colouring is therapeutic and fun.  I really enjoy it.  For this set of simple cards I stamped the Hero Arts Christmas Lights 6 x 6" background stamp on Neenah Solar White 80lb cardstock in Momento Tuxedo Black ink.  I chose this particular ink because it is Copic marker friendly.  Next, I chose markers in the red, green, blue and yellow families and sat down in front of the TV to colour.  I used two shades per colour, as the images are so small.


I tried to follow a pattern with my light colouring (red, blue, green, yellow), but I found the lights didn't line up perfectly for the pattern to work, so I added some purple lights in here and there to fill odd spots.  After the Copic colouring was finished, I added Wink Of Stella clear glitter pen highlighting to each bulb and touched up the base of each bulb with a silver Spica glitter pen. 

The 6 x 6 panel was large enough for me to cut into thirds and create three cards.  I adhered the coloured pattern to the left side of a side folding A2 card base, added a strip of red paper along the edge and stamped a holiday sentiment to the right of the red paper strip, near the bottom of the card.  The Christmas sentiments are from the Hero Arts Poster Christmas Carols stamp set, stamped in Versafine Onyx Black ink.

This card is in the same style, but the sentiment is from the Gina K Designs Christmas Greenery stamp set.

Thursday, September 20, 2018

Die Cut Balloon Cards

A Great Way to Use Scraps

I have a TON of cardstock scraps.  Scraps that I just can't part with because they are good quality cardstock and I'll eventually find a use for them.  Well, I found a use for them.  I made a set of birthday cards with die cut balloons on the front.

The Lawn Fawn Party Balloons Lawn Cuts dies are great for this card design.  There are a variety of shapes and sizes of balloons, as well as balloon strings and dies that allow you at add a highlight to the balloon (which I did not use here).


I cut a whole bunch of balloons in different sizes using the traditional balloon and traditional round balloon shapes.  This is something you can do while you watch TV.

But, the die cuts looked boring.  So, I pulled out a variety of old embossing folders (Stampin' Up!, Lifestyle Crafts, Taylored Expressions, Sizzix, Richard Garay, Design Objectives and a couple that are unmarked) and added embossed patterns to the balloons. 


Next, I die cut a bunch of balloon strings.  Once my images were all cut out, I arranged them on the front of my card in a pattern that seemed to work. 


Again, I thought the design looked boring.  And again, I decided to pull out my embossing folders to add some texture - this time to the card panel. 


Once I was happy with the card panel, I adhered it to the card base and added the balloons and balloon strings.  I then cut by hand some simple banners and rectangles, appropriately sized to fit on my card, and added a birthday sentiment with some Versafine Black Onyx ink. 
Below is a view of all of the cards together.


Tuesday, September 18, 2018

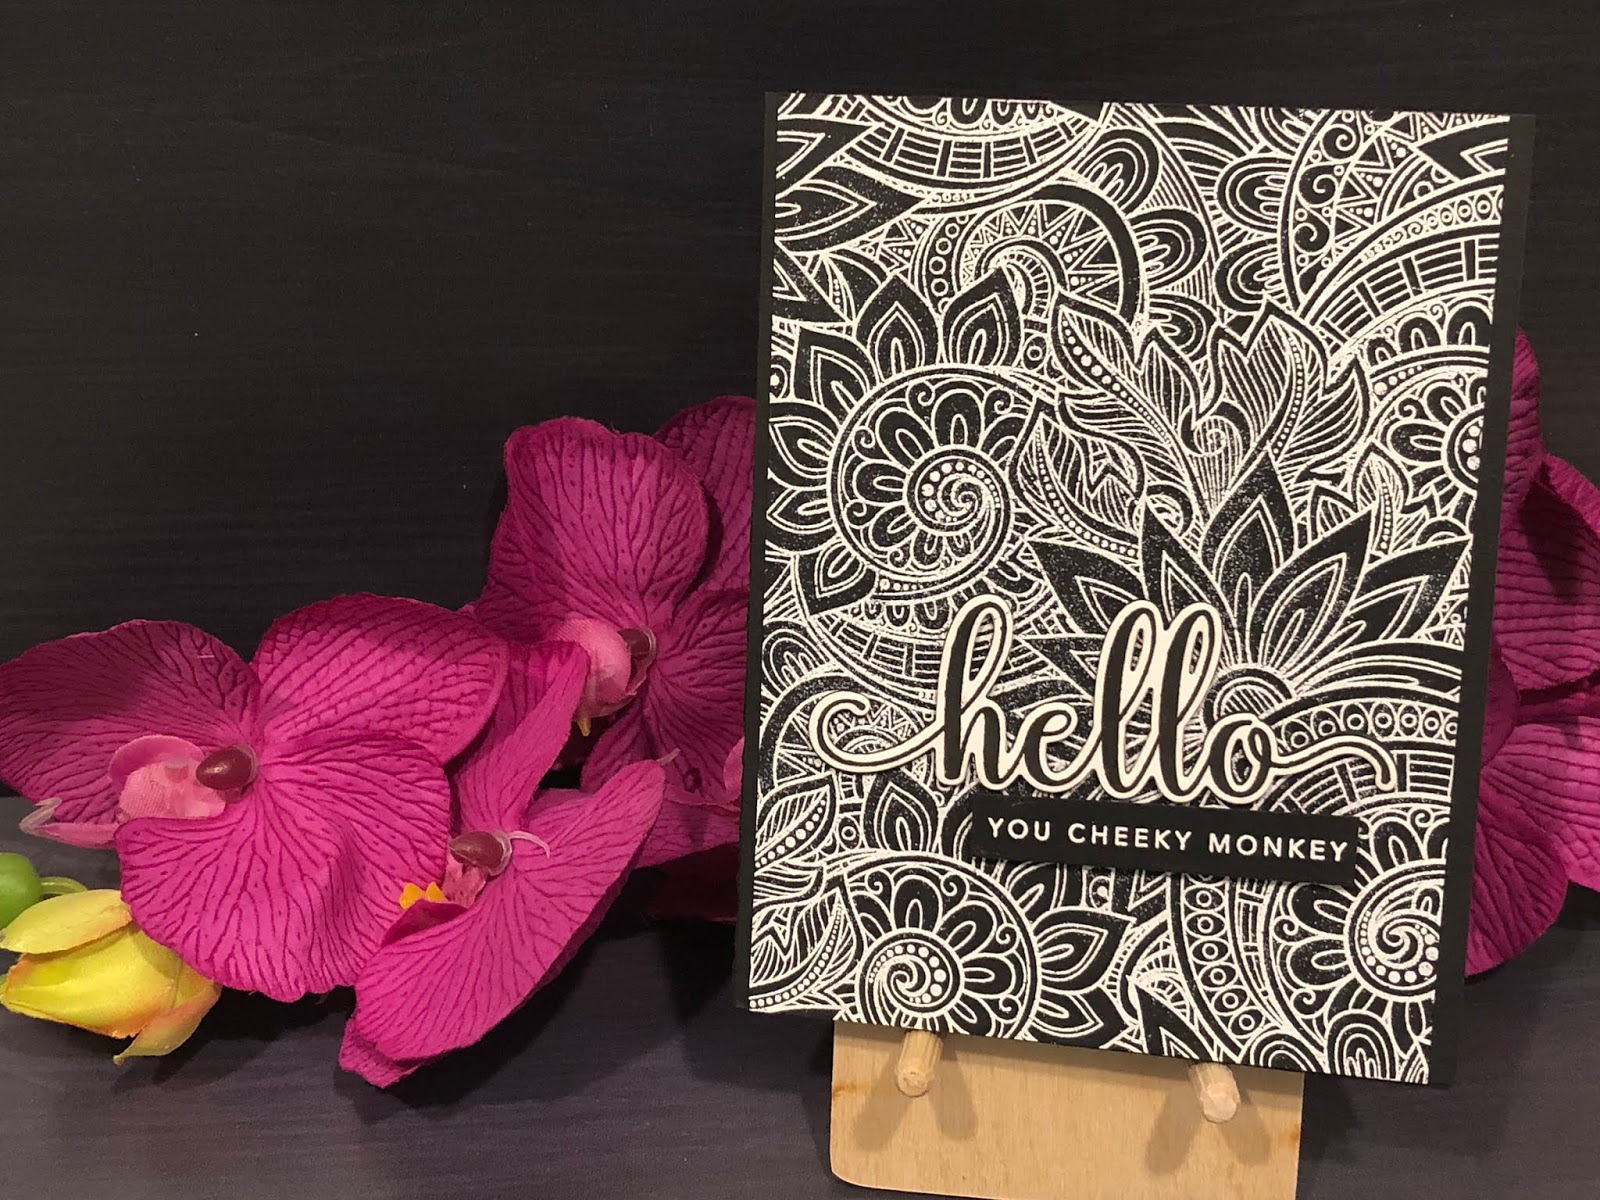
Hello, you cheeky monkey!

Embossing, Metallic Markers & Perfect Pearls


I fell in love with the Ornate Background stamp from Simon Says Stamp as soon as I saw it.  I pictured myself trying multiple techniques with it and these cards show the first few that I tried.


For this card, I treated the background panel of Neenah Solar White 80lb cardstock with my anti static powder tool, then I stamped the background image with Versamark embossing ink.  Next, I embossed the image using fine silver embossing powder from Ranger.  Once the background was ready for colouring, I pulled out my Crafter's Companion Precious Metals and Rare Minerals metallic markers and went to town colouring the image.  I love colouring.  I adhered the panel to a card base of Black Licorice cardstock from Lawn Fawn. 
This version of the card is simpler.  I treated the background panel of Black Licorice cardstock with my static powder tool, then I stamped the background image with Versamark embossing ink.  Instead of embossing in silver, I used a fine detail white embossing powder (also from Ranger).  I love the simple but dramatic contrast of the white on the black.


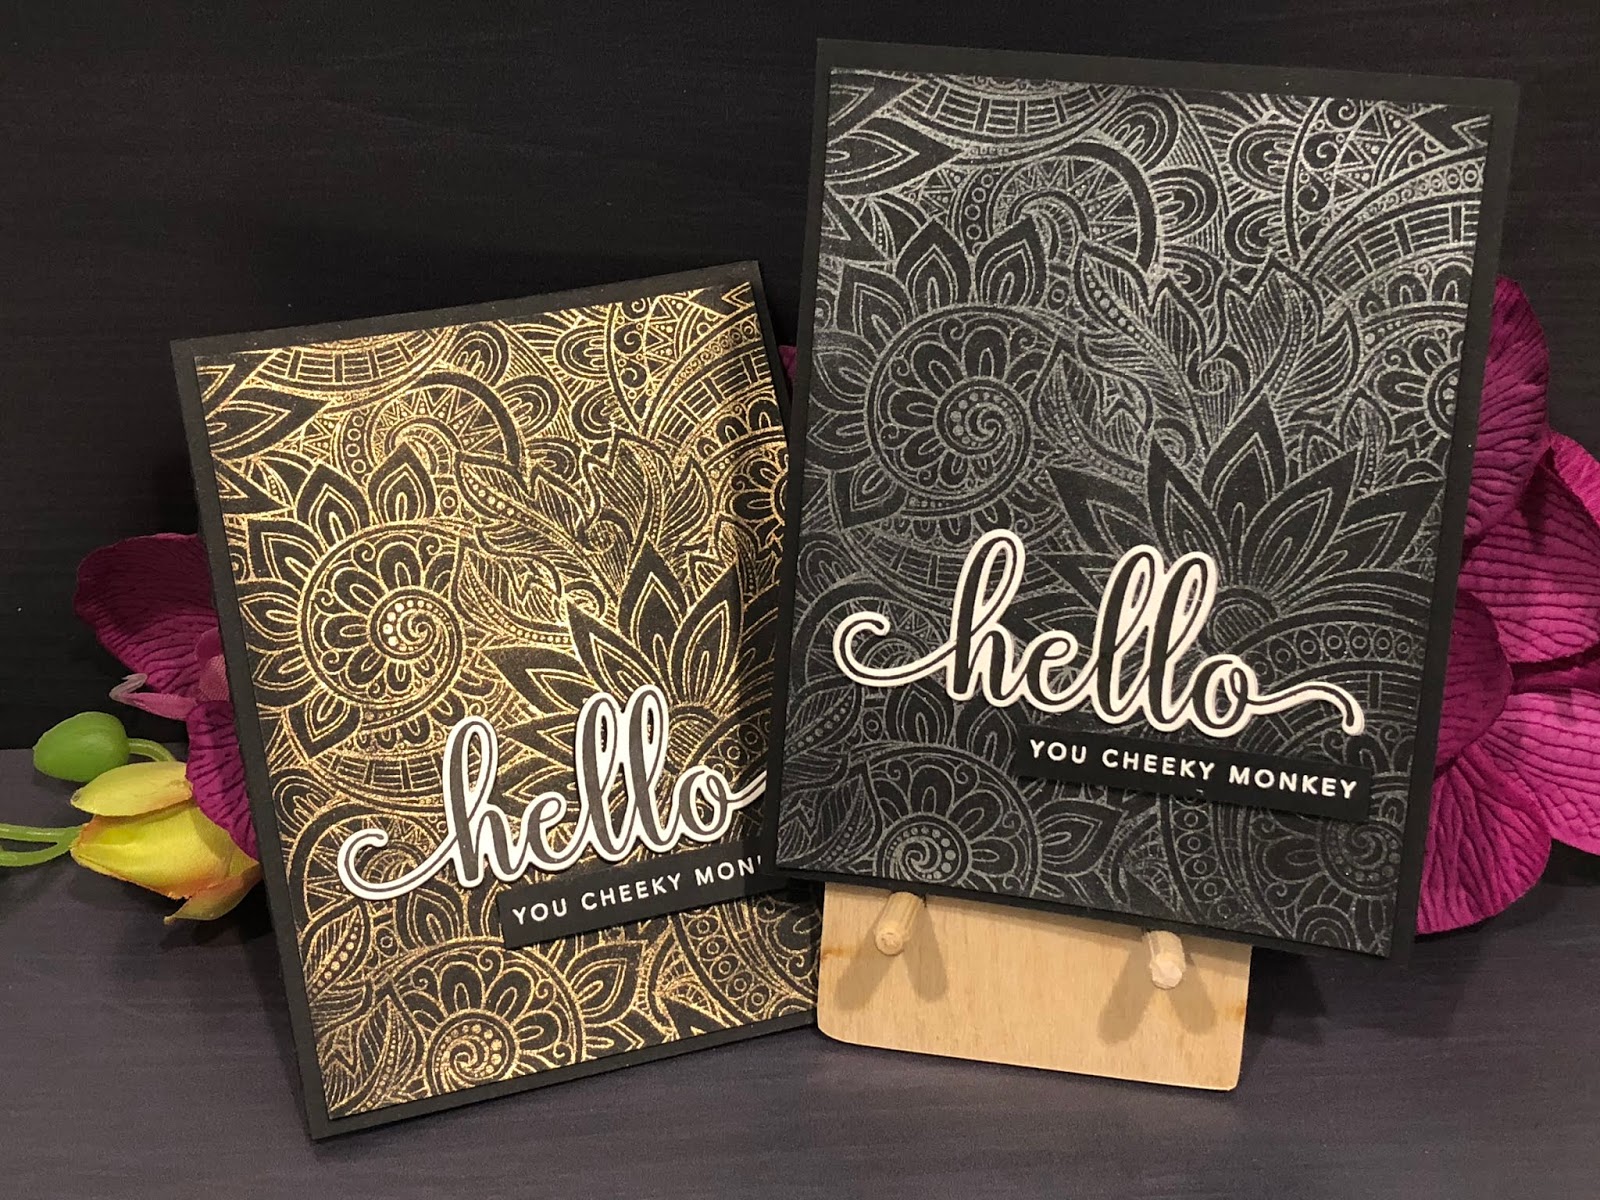
Below are two backgrounds that I created using embossing ink and Perfect Pearls powders in Perfect Gold and Perfect Pearl colours.  I set the powder with a fine mist of water.


The final touch for these cards is the fabulous sentiment - hello you cheeky monkey!  This is a CZ Designs stamp set with a matching die for the large "hello" sentiment. I stamped the large "hello" sentiment in Versafine Black Onyx ink on Neenah Solar White 80lb cardstock and die cut it.  I stamped the smaller sentiment on some Black Licorice cardstock and embossed it with white embossing powder.  Then, I adhered the sentiments to the card panel.


I love this set.  It's full of all kinds of snarky sayings that make me laugh out loud.  My girlfriends are definitely going to get a kick out of these cards. 

Wednesday, September 12, 2018

Birthday Cards using Concord & 9th Stamps and Dies

Birthday Cards

I continue to make birthday cards and I have wanted to use the Sprinkles turnabout stamp by Concord & 9th for some time.  The stamp comes with additional birthday themed images and sentiments, and there is also a coordinating set of dies that includes a very handy little tag.

 As I usually do, I made the same card design in several colour combinations. 

On the first card, I used a red and blue theme.  I stamped the sprinkles on the background using red, blue, green and brown inks.  The cupcake images offer several options.  There are two different outlines, two different cupcake cups, two different icing styles and two types of sprinkle toppings.  I mixed and matched the cupcake components to coordinate with the card colour theme. The next step was to die cut the tag in blue paper (from my scrap bin).  Then, I die cut the stamped cupcake images, stamped a sentiment on the tag in black (although, I wish now that I had used a brighter colour), stamped some sprinkles on the top of the tag and embossed them with red embossing power. As a finishing touch, I added some twine in red and blue to decorate the top of the tag.  The tag was then adhered to the card panel with foam squares and the panel was adhered to a top folding card base.

To the left, the same card design with a similar colour scheme, but with a red tag and yellow in the background sprinkles instead of the brown.

Below a brighter version of the card with a pool coloured tag and brighter colours used for the background sprinkles.  This one is my favourite colour combination.


A mix of the red and blue colour combination and the teal.

Monday, September 10, 2018

Birthday Cards for Kids

A Variety of Card Styles and Colours

I am making some cards for my sister's stash.  My nephew is at the age where he attends quite a few birthday parties for his friends and I said that I would make some cards for him to have on hand.  I started by using some dies from the June 2018 Spellbinders monthly die subscription.  The set includes a candle and a cupcake with some flower embellishments.

Candles

I created the same version of this card several times, but added a different number of candles to the front of each thinking that the card could be used for a person the age of the number of candles on the card.

My scrap bin came in handy for making the candles for these cards.  I used my Momento Tuxedo Black marker to colour the wicks of the candles. 

I kept the cards fairly simple.  I used patterned paper on the base of each card from the Swirly Fun 6 x 6 paper pad (by Your Next Stamp).  The card bases are made from Neenah Solar White 80lb cardstock.  I popped the candles and flames up using foam squares and the sentiment is from the Altenew Birthday Builder stamp set.


Cupcakes

I made a couple of cupcake birthday cards in traditional masculine colours, blue and green.  Of course, there had to be a candle on the cupcake for a birthday card.

I like that the dies have embossing detail in them.  In order to take advantage of this option, after die cutting the image you run the die cut image through the machine again,  using an embossing mat instead of the bottom cutting plate.  The pressure from the machine essentially squishes the paper into the embossing areas on the die and you wind up with an embossed pattern.  Easy peasy.

You'll notice that there are embossing line details on the cupcake wrapper, swirls in the cupcake icing and (although it is hard to see) curved line details in the candle and the flame.  The embossing creates extra dimension in the images.  Next time, I think I'll blend a bit of distress ink over the images to make the embossing lines more visible.  


I created a second version of the card using traditionally feminine colours.  This is the same design as the masculine version, but I added the decorative flowers to the pink and red(ish) versions of the card.  The flowers also have embossing detail, which adds to the image.

Again, I used patterned paper from the Swirly Fun paper pack by YNS.

Wednesday, September 05, 2018

General Purpose Cards

Gina K Designs Daisy Delight Stamp Set

I normally choose stamp sets that have matching dies, for convenience; however, when I saw this stamp set I could not resist.  The daisies are beautiful.  I decided to stamp two of each daisy image to colour with Copic markers and used a spring colour for one and a more fall feeling colour for the other (because those are my favourite seasons).


Once the images were coloured, I fussy cut them.  Instead of adhering them to a plain white card base, I raided my stash of coloured cardstock scraps and created pink and burnt yellow card bases, to coordinate with the Copic colouring.  In order to jazz up the white cardstock layer in between the card base and the image, I used embossing folders to add some texture.


Since I didn't want to take away from the beauty of the images, I did not add a sentiment.  I will add a sentiment on the inside, once I decide for what purpose I will use these cards.  Although, I very much like how they turned out and may decide to decorate my hobby room with them, instead.  ;-)

Monday, September 03, 2018

Lawn Fawn Birthday Cards

Birthday Cards for my Stash

My birthday card stash was a little low, so I thought I would make some cards that could be used for a variety of ages.  Since I absolutely love my Lawn Fawn stamps and dies, I thought I would use those products and make multiple cards in the same style.  I also used two different background colours, both of which can be used for either male or female recipients.


The side-fold card base is made from Lawn Fawn cardstock in Peacock (above) or Chili Pepper (below).  I cut the Quilted Backdrop die cut cover plate out of Neenah Solar White 80lb cardstock and layered it on the card base using my Lawn Fawn glue pen.  

The coloured images are from the Simply Celebrate stamp set, which I stamped in Momento Tuxedo Black ink (because it is Copic friendly).  Next, I coloured the images in rainbow colours with my Copic markers and die cut the images with the matching dies set.  I then popped the images up onto the card front using dimensional adhesive.


The last step was to stamp a sentiment, using Versafine Onyx Black ink, onto banner strips that I had cut and fish tailed by hand.  To keep the banners from blending into the background, I cut small pieces of cardstock that matched the card base and glued those pieces to the back of the banners.  The sentiment strips were then adhered to the card, also with dimensional adhesive.

I love the images in the Simply Celebrate set and very much look forward to making more cards using the holiday version!


Thursday, August 30, 2018

Simple birthday cards

Birthday cards are always good to have in your stash, so I made a few.  I used the Young at Heart stamp set and dies from one of the Stamp of Approval collections to create a colourful card front.  


I masked off a strip on the card front for the sentiment and stamped a pattern around with the circle stamps using Catherine Pooler Designs inks.  I added an embossed line on each side of the sentiment strip and used the fine tip of a Tim Holtz distress marker to trace either side of the embossed line.  


The last step was to add a die cut sentiment on the card front and a stamped sentiment on the inside.


Tuesday, August 28, 2018

Sympathy cards

Sympathy cards

Unfortunately, we all need a sympathy card now and then.  I used Birch Press Designs layering dies to create a white-on-white (on white) background and simply added an Avery Elle “with sympathy” die cut, keeping the design very simple.  I added a short, simple sentiment to the inside of the card from the matching Avery Elle stamp set to finish it off.


And a close up that shows the beautiful design of the layering dies.


Tuesday, March 27, 2018

Concord & 9th Christmas Cards

Ornamental Bundle

I was having quite a bit of fun making Christmas cards this year, especially using the Concord and 9th Christmas release.  For my first card, I made two colour combinations – red & gold and green, red & gold. I used Ranger embossing powder to emboss both the ornament and the sentiment and then I die cut the ornament and an ornament topper, adhered the topper on the ornament and  added an ornament string.

Concord & 9th Ornament - red and gold


Concord & 9th Ornament - red, green and gold


I used Ranger embossing powder to emboss both the ornament and the sentiment and then I die cut the ornament and an ornament topper, adhered the topper on the ornament and  added an ornament string. Lastly, I popped the ornament up on foam tape and placed it on a background of Lawn Fawn patterned paper.

Trim the Tree w/turnabout stamp background

The Trim the Tree set looks so good with the Christmas Cheer Turnabout stamp set. I am really
pleased with how these cards turned out.

Tree stripe detail with bow topper
Stamped ornaments on tree with star topper


I used Lawn Fawn inks to stamp the turnabout in different colour combinations and added the die cut tree to the front of the card panel. The tree was stamped with a sentiment and ornaments or with the stripes border stamp, using Versamark ink, to create dimension. The tree topper is either a die cut star or bow.


Saturday, February 03, 2018

Safari Sunset Cards


I created a set of six general cards using the Hero Arts safari-themed monthly kit.
 

The sunset background was created using Distress Oxide inks, masking off the ground area from the sky and vice versa, then stamping various animal scenes in silhouette using Versafine Black Onyx ink. 


The sunset background was created using Distress Oxide inks, masking off the ground area from the sky and vice versa, then stamping various animal scenes in silhouette using Versafine Black Onyx ink. 


I used some Strathmore Bristol paper to aid with blending and added the panel to a Lawn Fawn Black Licorice card base.  The fine black border complements the silhouette images.

Thursday, February 01, 2018

75th Birthday Card

Follow my blog with Bloglovin


A die set that I couldn’t wait to use – the Altenew Layered Plaid cover dies.


The sentiment is from the Happy Everything Lawn Fawn stamp set, stamped on a Bannertastic stamped (and die cut) sentiment strip.  I used Louie’s 123 dies to cut the numbers.


Sunday, January 28, 2018

Cards for my nephew to give as gifts

My nephew is in grade one this year and two of his friends have moved away.  Both are big changes in his life.  I asked him if he would like me to make some cards to send to his friends and he liked that idea, so I am going to send him a set of cards with his Valentine's Day card.  Pictures and details of the cards are below.

Cute Birdies
I used the Concord & 9th Birdie Banners and Alpha Bits sets for both cards and, on the card on the right side, I added a tree from the Gina K. Designs set Friends 'til the End.  I stamped with a variety of Lawn Fawn inks and used Tim Holtz Ranger Distress Markers to draw the grass and colour the wings and tail on the birds.  The clouds were blended in using Distress Ink and the My Favorite Things mini clouds stencil.  The last step was to score a line around the edge of the front of the card.

Cute critter cards
These one-layer cards were made using the Gina K. Designs stamp set Friends 'til the End.  I stamped the images on the left card with Momento Tuxedo Black ink and coloured the images with Chameleon coloured pencils.  The card on the right was stamped using a combination of Lawn Fawn coloured inks and Momento Tuxedo Black ink.  The owl was coloured with coloured pencils and the grass was drawn in with a Ranger Distress marker.  I masked the owl with a trimmed post-it note and blended the clouds onto the card panel using Ranger Distress ink and the MFT mini cloud stencil.  The last step was, again, to score a line around the edge of the card.

Airplane cards
One of my nephew's interests is things that fly so I used this cute Lawn Fawn set, Plane and Simple, to stamp and die cut the images.  They were coloured with Copic markers and adhered to a card panel that was embossed using the Lawn Fawn Stitched Cloud Backdrop (Landscape) after being cut down to size with the second largest die from the Lawn Fawn 4-bar sized Stitched Rectangle Stackables.

Buzy Bees
The cute little bees from the Honey Bee stamp set Build-a-Bee set make me smile.  I hope they make my nephew smile, too.  I coloured the bees with Copic markers, embossed the coloured card panel with a Lifestyle Crafts embossing folder and used a sentiment on the inside from the Honey Bee Bee-You-Tiful Sentiments set.

Monster Truck cards
And, since he loves them, I had to make a couple of cards with monster trucks that he could send to his friends.  The notecard is a 4-bar sized Lawn Fawn card and the panel was cut with the second largest of the 4-bar sized Stitched Rectangle Stackables and embossed with the Stitched Cloud Backdrop (Portrait).  The grass and the label were also both Lawn Fawn dies. The trucks are from the Your Next Stamp set called "Got Mud?" and were coloured with Chameleon coloured pencils.